
Pallet rack inspections often reveal recurring conditions that may affect rack stability, load capacity, stored products, and the people working nearby. Common findings include damaged uprights, detached braces, deformed beams, missing or damaged anchors, missing safety bars, and missing safety pins or beam safety clips. Warehouse teams should also watch for unauthorized repairs, leaning or bowed frames, corrosion, inadequate clearances, and rack configurations that no longer match the posted capacity information.
This guide explains what to check on each rack component, why each condition matters, and what information to record when something looks wrong. Use it during routine internal walk-throughs to help warehouse, operations, maintenance, and health and safety teams consistently identify and report visible rack conditions.
Quick answer: A pallet rack inspection checklist should cover upright columns, horizontal and diagonal braces, load beams and connectors, baseplates and anchors, safety bars and pallet supports, safety pins or beam locking devices, pallets and stored loads, repairs and modifications, rack alignment, corrosion, clearances, load-capacity information, and the records needed to track each finding through closure.
This guide answers what to check. For the aisle-by-aisle method, tools, and scan pattern, see How to Inspect Pallet Racking Systems: A 5-Step Process. For inspection timing and trigger events, see When Should You Get Your Pallet Racks Inspected? This checklist supports routine visual checks; it does not determine a damaged rack’s remaining structural capacity or replace qualified engineering review when stability, capacity, or the appropriate temporary control is uncertain.

Common Pallet Rack Inspection Issues at a Glance
| RACK COMPONENT OR CONDITION | What to Look For | Why It Matters |
|---|---|---|
| Columns or uprights | Dents, twists, buckling, tears, damaged welds, impact marks | Can affect rack load capacity |
| Horizontal and diagonal braces | Bent, missing, detached, cracked, or improperly fastened | Braces help stabilize uprights and maintain rack capacity |
| Beams and connectors | Unusual deflection, permanent bending, damaged welds, unseated or detached beam ends | Damage may affect load support or beam-to-column engagement |
| Baseplates, anchors, and shims | Missing, bent, loose, sheared, displaced, cracked, or improvised components | Rack stability can be compromised, especially during impacts or seismic events |
| Safety bars and pallet supports | Missing, damaged, displaced, loose, or improperly positioned | Can increase the risk of pallets falling between beam levels |
| Safety pins, clips, and locking devices | Missing, loose, distorted, incompatible, or improvised devices | A beam may be more vulnerable to accidental upward disengagement |
| Repairs and modifications | Field welds, patches, splices, drilled holes, cut members, mixed components | Undocumented work may alter structural behavior or leave capacity uncertain |
| Rack alignment | Leaning frames, bowed columns, uneven shimming, row misalignment | The condition may indicate impact, floor, installation, or anchoring problems |
| Corrosion | Flaking rust, pitting, swelling, coating loss, visible steel loss | Corrosion can reduce steel thickness or affect connections |
| Clearances and operating conditions | Contact with walls or equipment, blocked aisles, pallet overhang, unstable loads | Poor conditions can create recurring impacts, falling-load risks, or restricted access |
| Capacity information and configuration records | Missing plaques, unavailable LARCs, changed beam elevations, changed loads | The rack may no longer match the capacity information being displayed |
The following sections explain each checklist item in more detail.
Jump to an issue:
- Damaged Pallet Rack Uprights
- Deformed or Detached Braces
- Deformed Beams and Damaged Pallets
- Missing or damaged anchors, baseplates, and shims
- Missing or improperly installed rack safety bars
- Missing safety pins, safety clips, or beam locking devices
- Unauthorized repairs, field welds, and modifications
- Out-of-plumb and out-of-straight uprights
- Corrosion and possible steel section loss
- Rack clearances and operating conditions
1. Damaged Pallet Rack Uprights
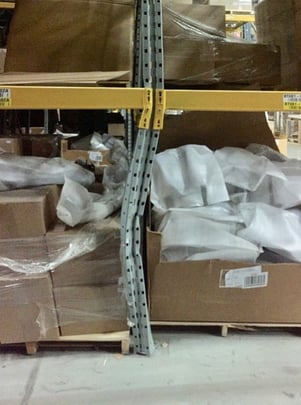
Upright columns are among the most load-critical components in a pallet rack system. During routine internal checks, examine both the front and rear columns from the baseplate to the top of the frame—not only the aisle-facing portion that is easiest to see.
Damage may appear as a smooth dent, local bend, twist, tear, split, buckle, damaged weld, or deformed base connection. The type, location, direction, and extent of the condition all matter. A shallow-looking dent is not automatically harmless.
The lower portion of the frame is especially exposed to forklift, pallet, and outrigger impacts, but damage can occur at any height and may be hidden by stored loads or beam connectors.
What to Look For
- Dents, bends, or local buckling
- Twisted or pinched column sections
- Forklift, pallet, or outrigger impact marks
- Cracks or damage around welds
- Damage near beam connectors
- Corrosion around the base or connection points
- Damage at more than one location on the same column
- Movement or damage at the column-to-baseplate connection
What to Record and Do Next
Record the facility, aisle, bay, front or rear column, height of the condition, close-up and location photographs, and a clear description of what is visible. Follow your facility’s escalation procedure and avoid making a structural decision from appearance alone.
The 1-2-3 Rule can help screen certain smooth frontal, lateral, and brace deformations. Take a look at our Rack Damage Assessment: The 1-2-3 Rule Explained article for the method and its limitations.
Tip: Give extra attention to aisle ends, tunnel entrances, dock-door frames, transfer aisles, and other high-traffic areas where impacts are more likely.
2. Deformed or Detached Braces
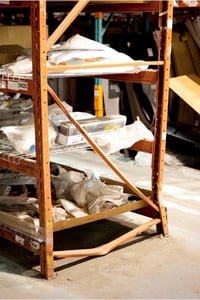 Horizontal and diagonal braces connect the front and rear columns and help stabilize the upright frame. Brace damage may be less obvious than column damage, particularly behind stored loads or at the rear of the rack.
Brace damage can result from forklift or pallet contact, impact at the frame base, missing fasteners, failed welds, incompatible replacement parts, or previous repairs. A brace that is missing or no longer connected cannot perform its intended function.
"Pallet racks form an interconnected steel web, and a single severely damaged component like a brace can jeopardize the entire system’s integrity, leading to potential collapse."
— Charles Carbonneau, P.Eng., Chief Engineer, Damotech
What to Look For
- Missing braces
- Bent, dented, or buckled braces
- Detached horizontal or diagonal braces
- Cracked or separated welds
- Missing or broken fasteners
- Impact damage
- More than one damaged brace on the same frame
- Replacement members or repairs that do not match the approved configuration
What to Record and Do Next
Record whether the affected member is horizontal or diagonal, its position on the frame, the condition of both connections, and any nearby column or base damage. Do not assume that a damaged brace is acceptable because the columns still appear straight. Multiple brace conditions on the same frame should be considered together.
Damaged braces may be candidates for an engineered repair or component replacement, but the appropriate response depends on the rack design, loading, condition, and qualified assessment.
Get the editable inspection checklist and illustrated rack damage assessment guide
3. Deformed Beams, Damaged Connectors, and Damaged Pallets
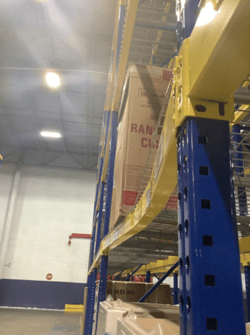 Load beams support stored pallets and transfer their loads into the upright frames. Check the beam body, end connectors, connector welds, engagement with the upright, and the pallets and loads resting on the beam pair.
A loaded beam will normally deflect to some degree. The important questions are whether the deflection is consistent with the approved design, whether the loading matches the posted configuration, and whether impact or permanent deformation is present.
Damaged pallets should also be identified because they can create unsafe loading conditions and contribute to rack damage.
What to Look For
- Visible impact damage
- Permanent bending or twisting
- Loaded beams with unusual or uneven sagging
- Permanent deformation that remains after unloading
- Partially engaged or unseated beam ends
- Detached beam ends
- Pallet overhang, uneven placement, or loads leaning toward the aisle
- Cracked, unstable, undersized, contaminated, or otherwise unsuitable pallets
Beam Deflection Guideline
At design working loads, a commonly used serviceability limit for a selective rack beam is approximately:
Beam Length ÷ 180
For example:
- 96-inch beam = approximately 0.53 inches
- 144-inch beam = approximately 0.80 inches
This ratio is a serviceability check under load; it is not proof that an impacted or permanently deformed beam is structurally acceptable. Cracked welds, damaged connectors, impact damage, permanent deformation after unloading, or loading that does not match the approved rack design still require further review. RMI likewise explains that L/180 is a beam-deflection criterion rather than a standalone assurance of structural integrity.
What to Record and Do Next
Record whether the condition affects the beam body, connector, weld, pallet, or stored load. If a beam is partially disengaged, detached, permanently deformed, or visibly damaged, prevent additional loading or configuration changes while the condition is handled under your facility’s procedure.
Remove visibly unsafe pallets from use in accordance with the facility’s material-handling procedure. Do not assume that a beam is acceptable simply because its measured deflection is below L/180.
4. Missing or Damaged Anchors, Baseplates, and Shims
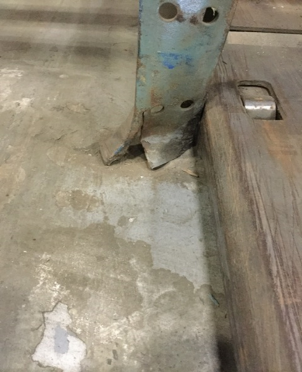 Baseplates transfer column forces to the floor. Anchors and shims form part of the approved installation and should not be treated as interchangeable or generic hardware.
During routine internal checks, examine the front and rear column bases, the baseplate, each required anchor location, the shims, and the surrounding slab. Damage at the base may accompany an impact to the upright or rack protector.
What to Look For
- Missing, loose, bent, or sheared anchors
- Damaged or deformed baseplates
- Cracks, spalling, or other visible slab damage near the base
- Missing, displaced, undersized, or unstable shims
- Wood, plastic, or other improvised shimming
- Gaps under the baseplate
What to Record and Do Next
Record whether the condition affects the front or rear column, the baseplate, an anchor, the shims, or the surrounding floor. Include a close-up and a wider photograph showing the rack base and nearby damage.
Do not drill, add, tighten, or replace anchors—or add shims—without confirming the approved rack design, manufacturer instructions, slab conditions, and applicable requirements. Where anchoring or base conditions are uncertain, escalate the complete base connection for qualified review.
Tip: Pay close attention to aisle ends, transfer aisles, dock areas, and other locations where forklifts or outriggers repeatedly pass close to the rack base.
5. Missing or Improperly Installed Rack Safety Bars
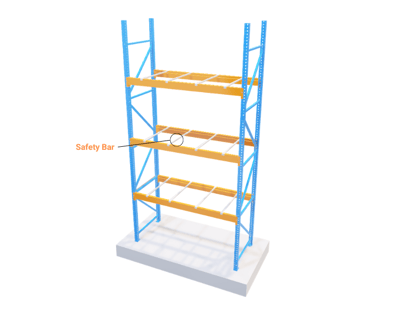 Safety bars and pallet-support accessories are used in certain rack applications to support pallets or reduce the possibility of a pallet dropping between the beams. Their required type, number, position, engagement, and capacity depend on the rack design, pallet type, stored load, and intended application.
During routine checks, verify that pallets are fully supported, correctly positioned, and in suitable condition.
Pay particular attention to braces at lower levels and in impact-prone areas. The significance of brace damage depends on its location, the rack design and loading, the condition of its connections, and other damage affecting the same frame.
What to Look For
- Missing safety bars or pallet supports
- Bent, cracked, or otherwise damaged supports
- Loose, displaced, or improperly secured supports
- Supports installed in the wrong position
- Supports that do not fully engage the beams
- Damaged or overloaded wire mesh decking
What to Record and Do Next
Record the bay, beam level, type, and quantity of support present and visible condition. Restore missing or damaged components with compatible, properly rated parts when required by the design.
6. Missing Safety Pins, Safety Clips, or Beam Locking Devices
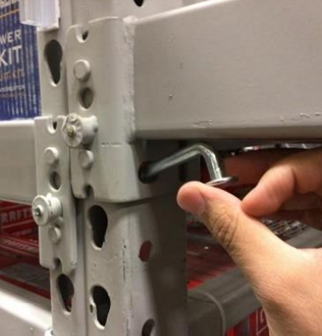 Safety pins, safety clips, bolts, and other beam locking devices help resist accidental upward disengagement of a beam connector from the upright. These devices are small and easy to overlook, which is exactly why they deserve a separate line on the checklist.
Check every beam-to-upright connection and verify that the locking device required for that connection is present, correctly installed, compatible, and undamaged.
What to Look For
- Missing safety pins or clips
- Pins or clips hanging loose instead of being fully engaged
- Bent, cracked, or distorted locking devices
- Devices installed in the wrong location
- Incompatible replacement clips
- Improvised wire, nails, miscellaneous bolts, or other makeshift substitutes
What to Record and Do Next
Record the aisle, bay, beam level, left or right connector, and the type and condition of the locking device. Use the rack manufacturer’s specified locking device or another properly approved compatible device. Do not assume that a clip is suitable merely because it fits into the opening.
Do not use improvised substitutes. Wire, nails, unmatched clips, or miscellaneous fasteners should not be treated as equivalent to the specified locking device.
Additional Conditions to Include in the Checklist
The original six component issues account for many visible findings, but a complete internal checklist should also address the following conditions.
Unauthorized Repairs, Field Welds, and Modifications
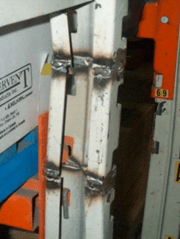 A repair can look solid while leaving the rack’s structural performance and approved capacity undocumented.
Unapproved repairs or modifications can change the properties, geometry, load path, or connection behavior of the affected component. Appearance alone cannot confirm that a repair provides the required performance.
What to Look For
- Welded patches or plates
- Field-welded braces, beams, or columns
- Drilled or enlarged holes
- Cut or notched components
- Homemade reinforcements
- Mixed components from different manufacturers
- Replacement members that do not match the approved design
- Repairs with no drawing, calculation, specification, or certification
What to Record and Do Next
Photograph the entire repair and the surrounding rack configuration. Verify whether an approved repair drawing, calculation, specification, or other technical documentation is available. The documentation should identify the approved repair configuration and the load capacity that applies after the work. Where the design basis cannot be confirmed, obtain a qualified technical review.
Out-of-Plumb and Out-of-Straight Uprights
These terms describe different conditions:
- Out-of-plumb: The upright remains relatively straight but leans in the cross-aisle or down-aisle direction.
- Out-of-straight: The column itself is bowed, bent, or locally deformed, even if the frame appears approximately vertical overall.
What to Look For
- Frames leaning cross-aisle or down-aisle
- Floor settlement, cracking, or slope
- Misaligned rack rows
- A change following an impact, relocation, or reconfiguration
What to Record and Do Next
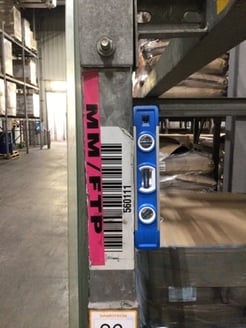 Record whether the condition is out-of-plumb, out-of-straight, or both; the direction and approximate extent; and any associated floor condition. A laser level, plumb tool, or equivalent device can help document the condition.
Do not assume that simply adding shims is the correct solution. The cause may involve the floor, anchoring, impact damage, installation, rack configuration, or several factors acting together.
3. Corrosion and Possible Steel Section Loss
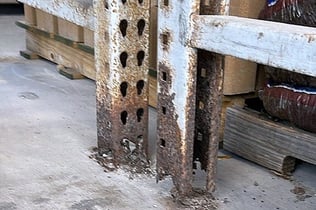 Rust forming on racking components is often overlooked until it becomes a significant issue. Over time, environmental factors such as moisture, temperature fluctuations, and exposure to corrosive substances, including rain and snow, can lead to rust formation on the racks.
What to Look For
- Damaged or missing protective coating
- Flaking rust
- Corrosion around welds, connectors, and fasteners
- Rust at baseplates and anchors
- Repeated moisture exposure
- Conditions in freezers, washdown areas, outdoor storage, or chemically aggressive environments
What to Record and Do Next
Document the component, location, environment, photographs, and apparent extent of the corrosion. Escalate conditions involving flaking, pitting, visible steel loss, damaged welds, or affected connections for qualified review.
4. Rack Clearances, Protection, and Operating Conditions
A rack can be free of visible structural damage yet still be exposed to poor operating conditions or to contact with nearby equipment and building elements.
What to Look For
- Racks touching building columns or walls
- Contact with piping, conveyors, mezzanines, or other fixed equipment
- Unapproved connections between the rack and the building
- Insufficient operating clearance for material-handling equipment
- Blocked or obstructed aisles
- Items stored directly on braces
- Products, signs, or equipment attached to the rack without approval
- Fire-protection clearances that do not match facility requirements
What to Record and Do Next
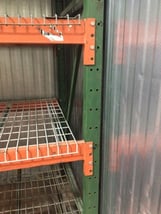 Record the rack location, nearby building or equipment element, visible contact or clearance condition, and photographs showing the surrounding area. Correct operating conditions where possible, but do not alter the rack or connect it to the building without approved documentation.
Additional Internal Checklist Items
Beyond visible component damage, verify the following during routine walk-throughs:
- Load capacity plaques/labels: Are they present, legible, and matched to the current configuration?
- LARC drawings: Are current Load Application and Rack Configuration drawings, calculations, repair records, and previous findings available?
- Configuration changes: Have beam elevations, beam models, rack geometry, pallet weights, pallet types, or stored products changed?
- Protective measures: Are guards and barriers present, correctly positioned, and undamaged in recurring impact zones?
- Aisles and floor conditions: Are aisles clear, floors in good repair, and forklift operating clearances adequate?
- Employee awareness: Do employees know how to recognize and report rack damage or configuration changes?
What to Record for Every Rack Finding
A checklist is most useful when it produces enough information to locate, understand, assign, and close each finding. Record:
- Facility, zone, aisle, row, bay, and storage level
- Front or rear frame and exact component
- Date and person reporting the condition
- A wide photograph showing the location
- A close photograph showing the visible condition
- A clear description of what was observed
- Assigned priority level
For Multi-Site Warehouses
Use the same component terminology, location-naming convention, photograph requirements, priority framework, escalation rules, owner fields, due-date fields, and closure evidence at every facility.
Standardization makes it easier to compare sites, identify recurring damage patterns, budget corrective work, and verify that findings are being closed consistently.
Download the editable Excel and PDF inspection checklist to standardize how your team records rack conditions.
What to Do When Damaged or Defective Racking Is Found
Follow your facility’s rack-damage response procedure to control access, loading, or further exposure as warranted by the condition. Then document and escalate the finding.
The appropriate temporary control depends on the specific condition. A missing accessory, unstable pallet, detached structural member, impact-damaged upright, uncertain anchorage, and unknown load capacity may require different responses.
Depending on the condition, the next step may involve monitoring, planned maintenance, access restrictions, partial or full unloading, engineered repair, component replacement, updated capacity documentation, or further engineering review.
When the condition’s significance or the correct temporary control is unclear, request an engineer-led rack inspection.
Why Rack Damage Often Goes Unreported
Not all rack damage is noticed when it happens. Forklift and pallet-jack operators may not always realize they caused an impact, and workers may hesitate to report a condition if they fear blame. Over time, unawareness and underreporting can allow damage to accumulate.
Building a no-blame reporting culture—where employees are trained to recognize rack conditions and encouraged to report them promptly—can make it easier to identify issues earlier.
"Warehouse workers are also less likely to report an accident involving a pallet rack system if they fear retaliation."
— Charles Carbonneau, P.Eng.
The goal is not to assign blame. It is to give the warehouse team enough information to control the condition and keep a small issue from becoming a larger operational problem.
What This Checklist Can—and Cannot—Tell You
This checklist can help trained employees identify and consistently document visible rack conditions. It cannot:
- Determine a damaged rack’s remaining structural capacity
- Certify compliance with every applicable requirement
- Verify that a repair restores the approved design or capacity
- Account for every interaction among loading, seismic forces, configuration, anchoring, floor conditions, and multiple deficiencies
- Replace the approved rack drawings, manufacturer instructions, or qualified engineering judgment
For formal assessment, reports, standards review, and corrective-action recommendations, see how our Racking Inspection Services can help you.

Pallet Rack Inspection Checklist FAQs
What are some of the most common pallet rack inspection issues?

Common findings include damaged or twisted uprights, bent or detached braces, deformed or unseated beams, damaged connectors, missing or damaged anchors, missing safety bars, and missing safety pins or beam locking devices. A complete checklist should also cover unauthorized repairs, out-of-plumb or bowed frames, corrosion, clearances, pallets, load placement, and capacity documentation.
What should a pallet rack inspection checklist include?
It should cover upright columns, horizontal and diagonal braces, beams and connectors, baseplates and anchors, shims, safety pins and clips, safety bars, pallets, load capacity labels/plaques, local repairs, locations, and priority levels. Download Damotech’s editable inspection checklist (Excel and PDF) to standardize your walk-throughs.
What should be your first action when you find defective racking?
Protect people from further exposure under your facility’s established procedure, then document and escalate the condition. Record the exact location, take close and wide photographs, and prevent further impacts or unauthorized changes. The need for access restrictions, partial or full unloading, repair, replacement, or monitoring depends on the specific condition and qualified direction.
What are the most common signs of rack damage to watch for?
Watch for dents, twists, tears, buckling, cracked welds, missing or detached braces, unusual beam deflection, unseated connectors, missing locking devices, damaged anchors and baseplates, leaning uprights, field welds, flaking corrosion, unstable pallets, and rack configurations that no longer match the posted capacity information.
What information should be recorded when a rack problem is found?
Record the facility, aisle, bay, level, component, date, description, and close and wide photographs.